Profitable trading on Binance Futures USDT-margin with the bot
Content
1. Advantages and disadvantages of futures trading
2. Opening an account on Binance Futures
3. Replenishment of the USDT-margin futures account
4. Creating an API key on Binance for futures trading
5. Adding the API key to RevenueBot
6. Creating a bot for USDT-margin Binance Futures using the “Quick start” menu
7. Fine-tuning the bot
8. The position of mode
1. Advantages and disadvantages of futures trading
The Binance Futures Platform allows you to trade perpetual cryptocurrency futures contracts with leverage.
Advantages of futures trading:
- Using leverage allows you to open large positions with minimal investment. You can use leverage up to x125 for some trading pairs.
For example, if you have 1000USDT on a futures account and use X10 leverage, you can open a position at 10000USDT and get the opportunity to increase your profit if the position is successfully closed;
- Using futures, you can fully short, making a profit in a falling market (open a SHORT position and make a profit during a bearish trend, so as not to lose your funds;
- Perpetual futures contracts allow you to keep a position open for as long as you want.
Disadvantages and risks of futures trading:
- If you use a large amount of leverage, then there is a possibility that the entire margin balance in the futures wallet may be liquidated in case of an extreme price change. Therefore, you need to fully understand how this trading tool works and be able to assess risks;
- In addition, it is important to develop and strictly follow money management to avoid liquidating all funds;
- It is mandatory to have insurance funds on the futures account that are not involved in trading until the right moment. This will make it possible to get profit in the open position.
2. Opening an account on Binance Futures USDTS-margin
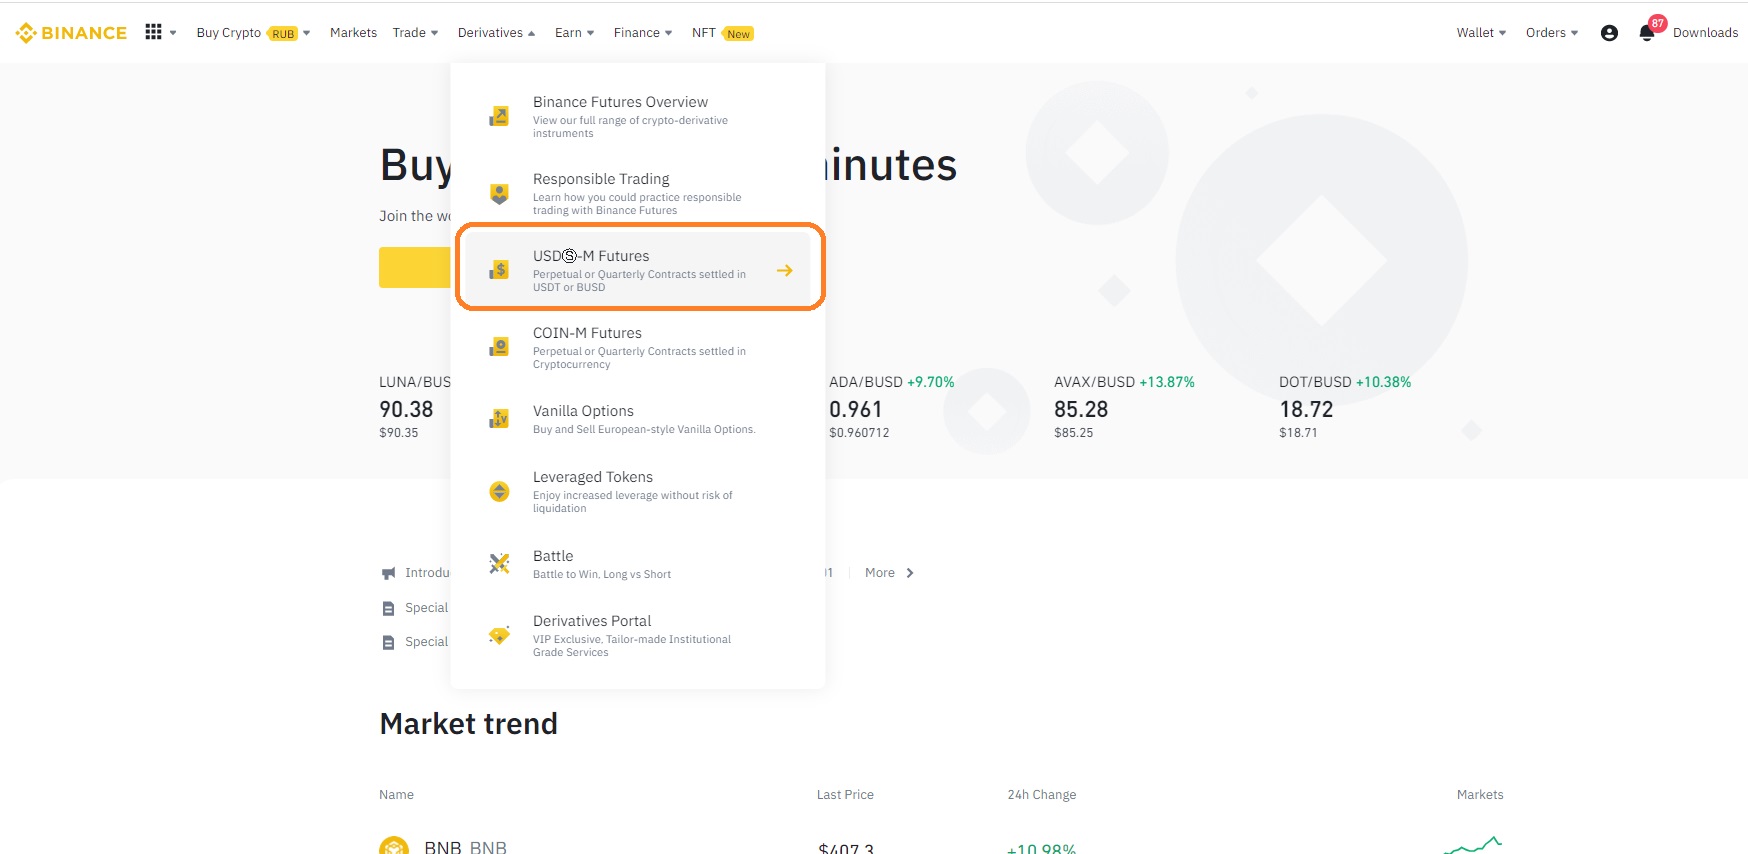
- Click on “Open now” in the lower right corner. We would be grateful if you use our referral code 40247736 =);
- After that, the futures account will be activated, and you can start trading.
3. Replenishment of the USDT-margin futures account
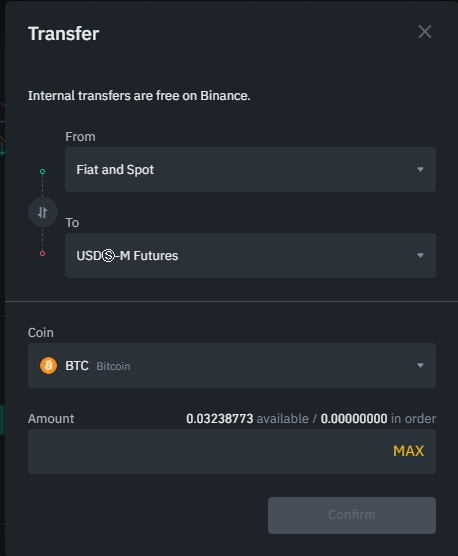
- If you want to start trading USDT-margin futures on Binance, you will need to transfer USDT from your spot wallet to your USDT-margin futures wallet. To do this, click on “Transfer” in the lower-right corner after entering the USDT-m Binance Futures trading page;
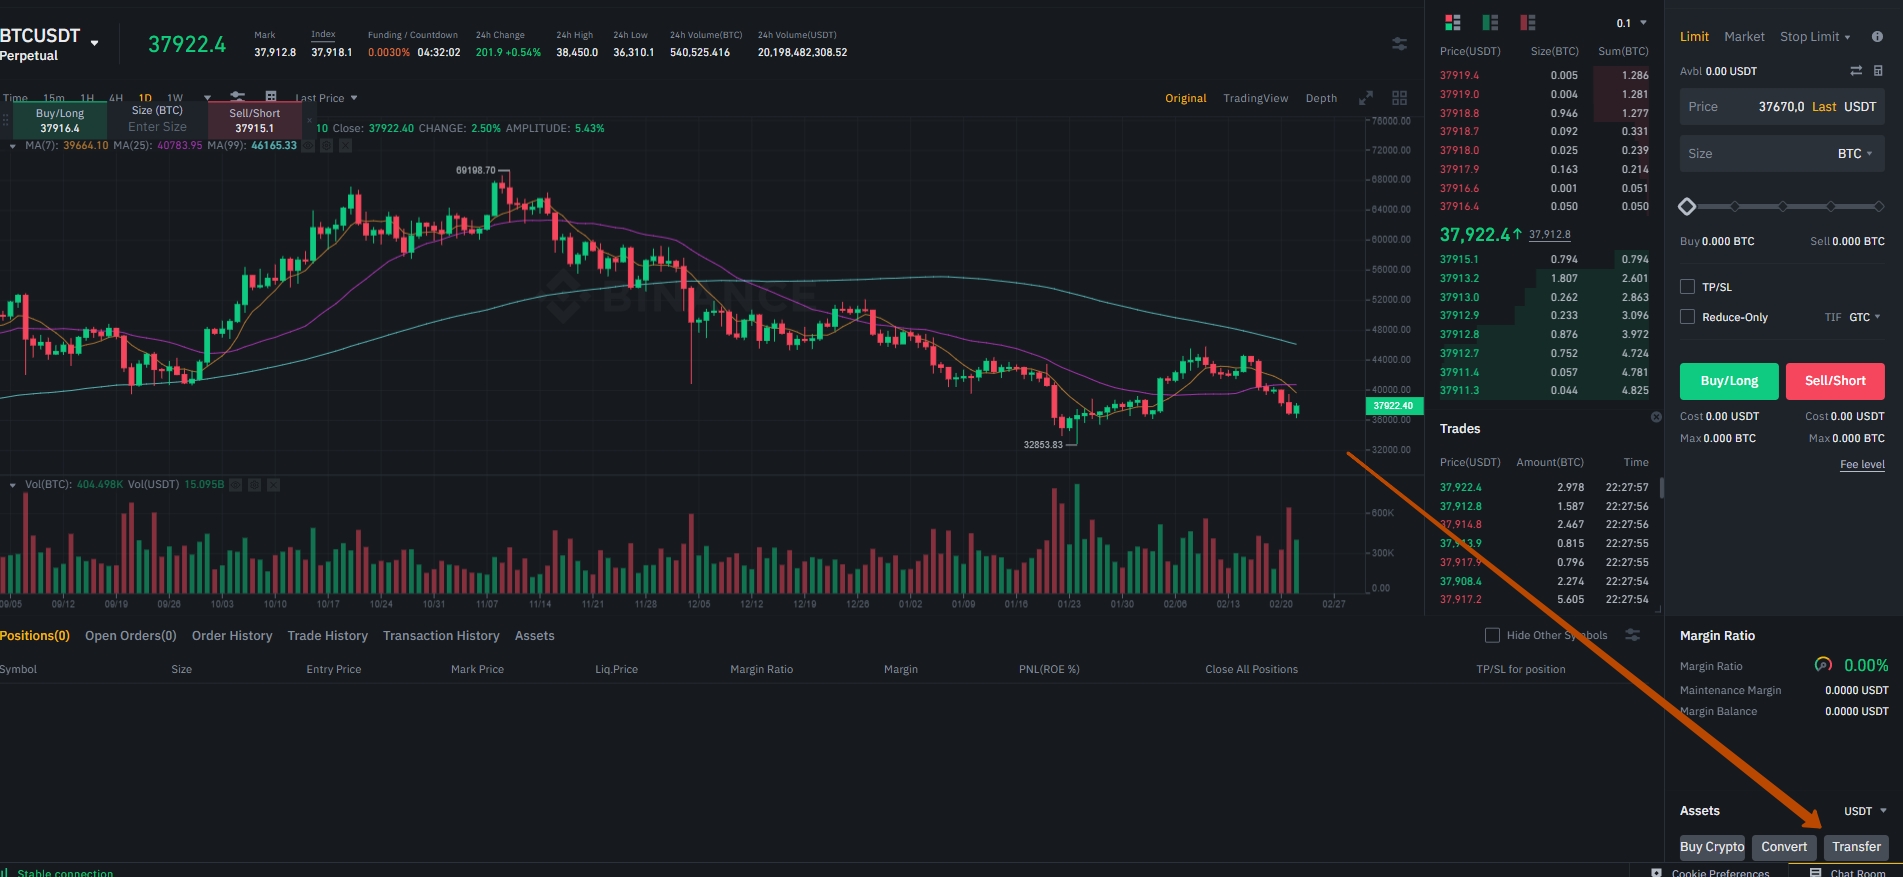
- Enter the USDT amount you want to transfer to the futures account. Then, click on “Confirm transfer”.
ATTENTION! When trading USDT-margin with the RevenueBot futures bot, you can only top up your balance in USDT, trading will only be possible on the USDT market, and the Commission for trading is also taken in USDT;
- You can also use the transfer function to transfer funds back to your spot account.
4. Create an API key for trading on Futures USDT-M
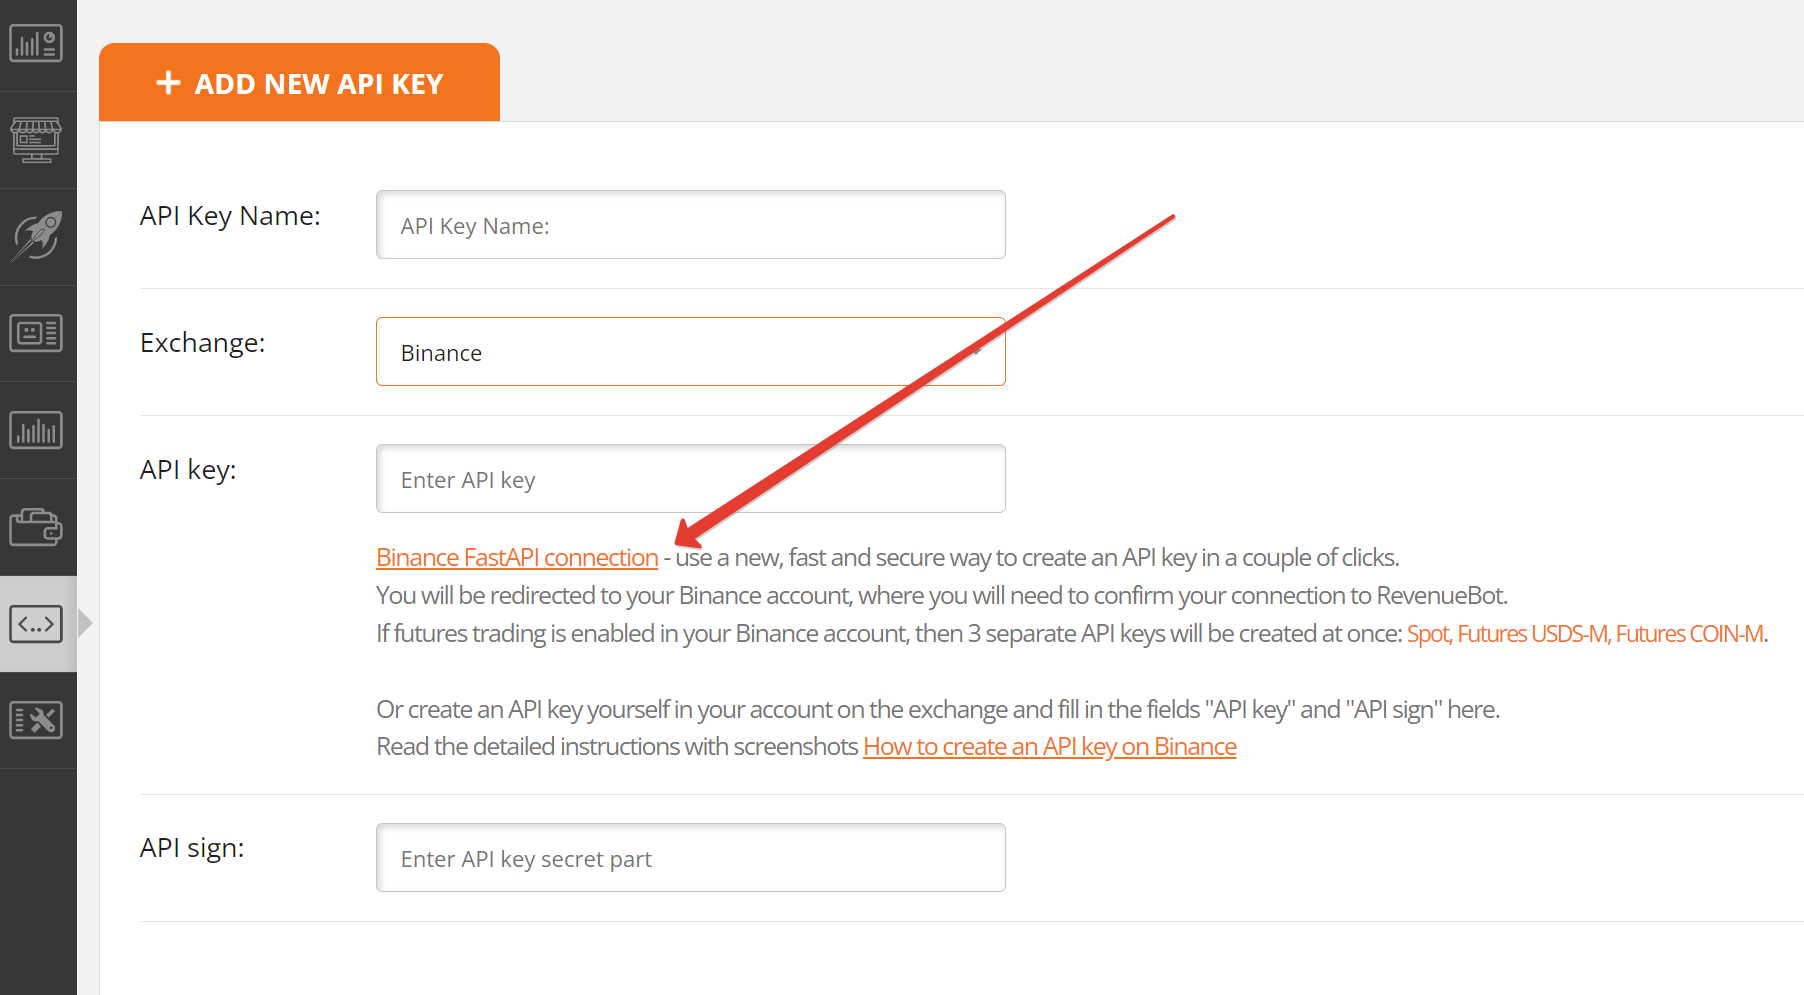
Now we have a new way to quickly create an API key for the Binance exchange!
Binance FASTAPI is a convenient, fast and secure way to create API keys. With FASTAPI, you can automatically generate and bind API keys in a couple of clicks without having to enter them manually.
If futures trading is enabled in your Binance account, then using Binance FASTAPI, 3 separate API keys are created at once — Spot, Futures USDS-M, Futures COIN-M.
When FASTAPI is connected, a white list of IP addresses is used, which ensures the safety and security of user funds. All trading operations will be allowed only from IP addresses from the white list. In addition, the FASTAPI connection cancels the 90-day validity period of the API key.
To use this function, you need to select the Binance exchange on the API key addition page and click the link "FASTAPI connection", you will be redirected to your Binance account, where you will need to approve access. If you are not logged in to the exchange, then you will need to log in first, it is better to do this before creating an API key.
Next, approve access to your account to create an access API.
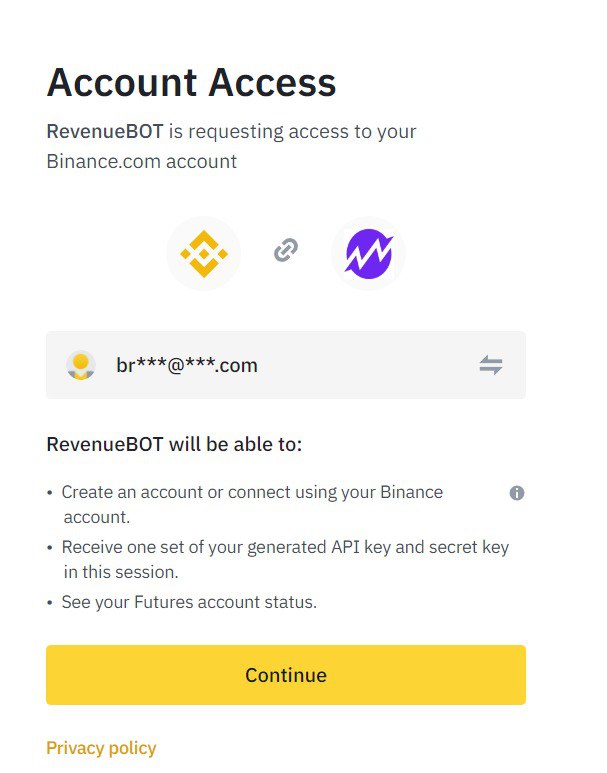
After successful completion of the operation, you will receive the message "The key 'FastAPI key' has been successfully created" and you will be able to use the created keys for the Binance Spot, Futures USDS-M и COIN-M.

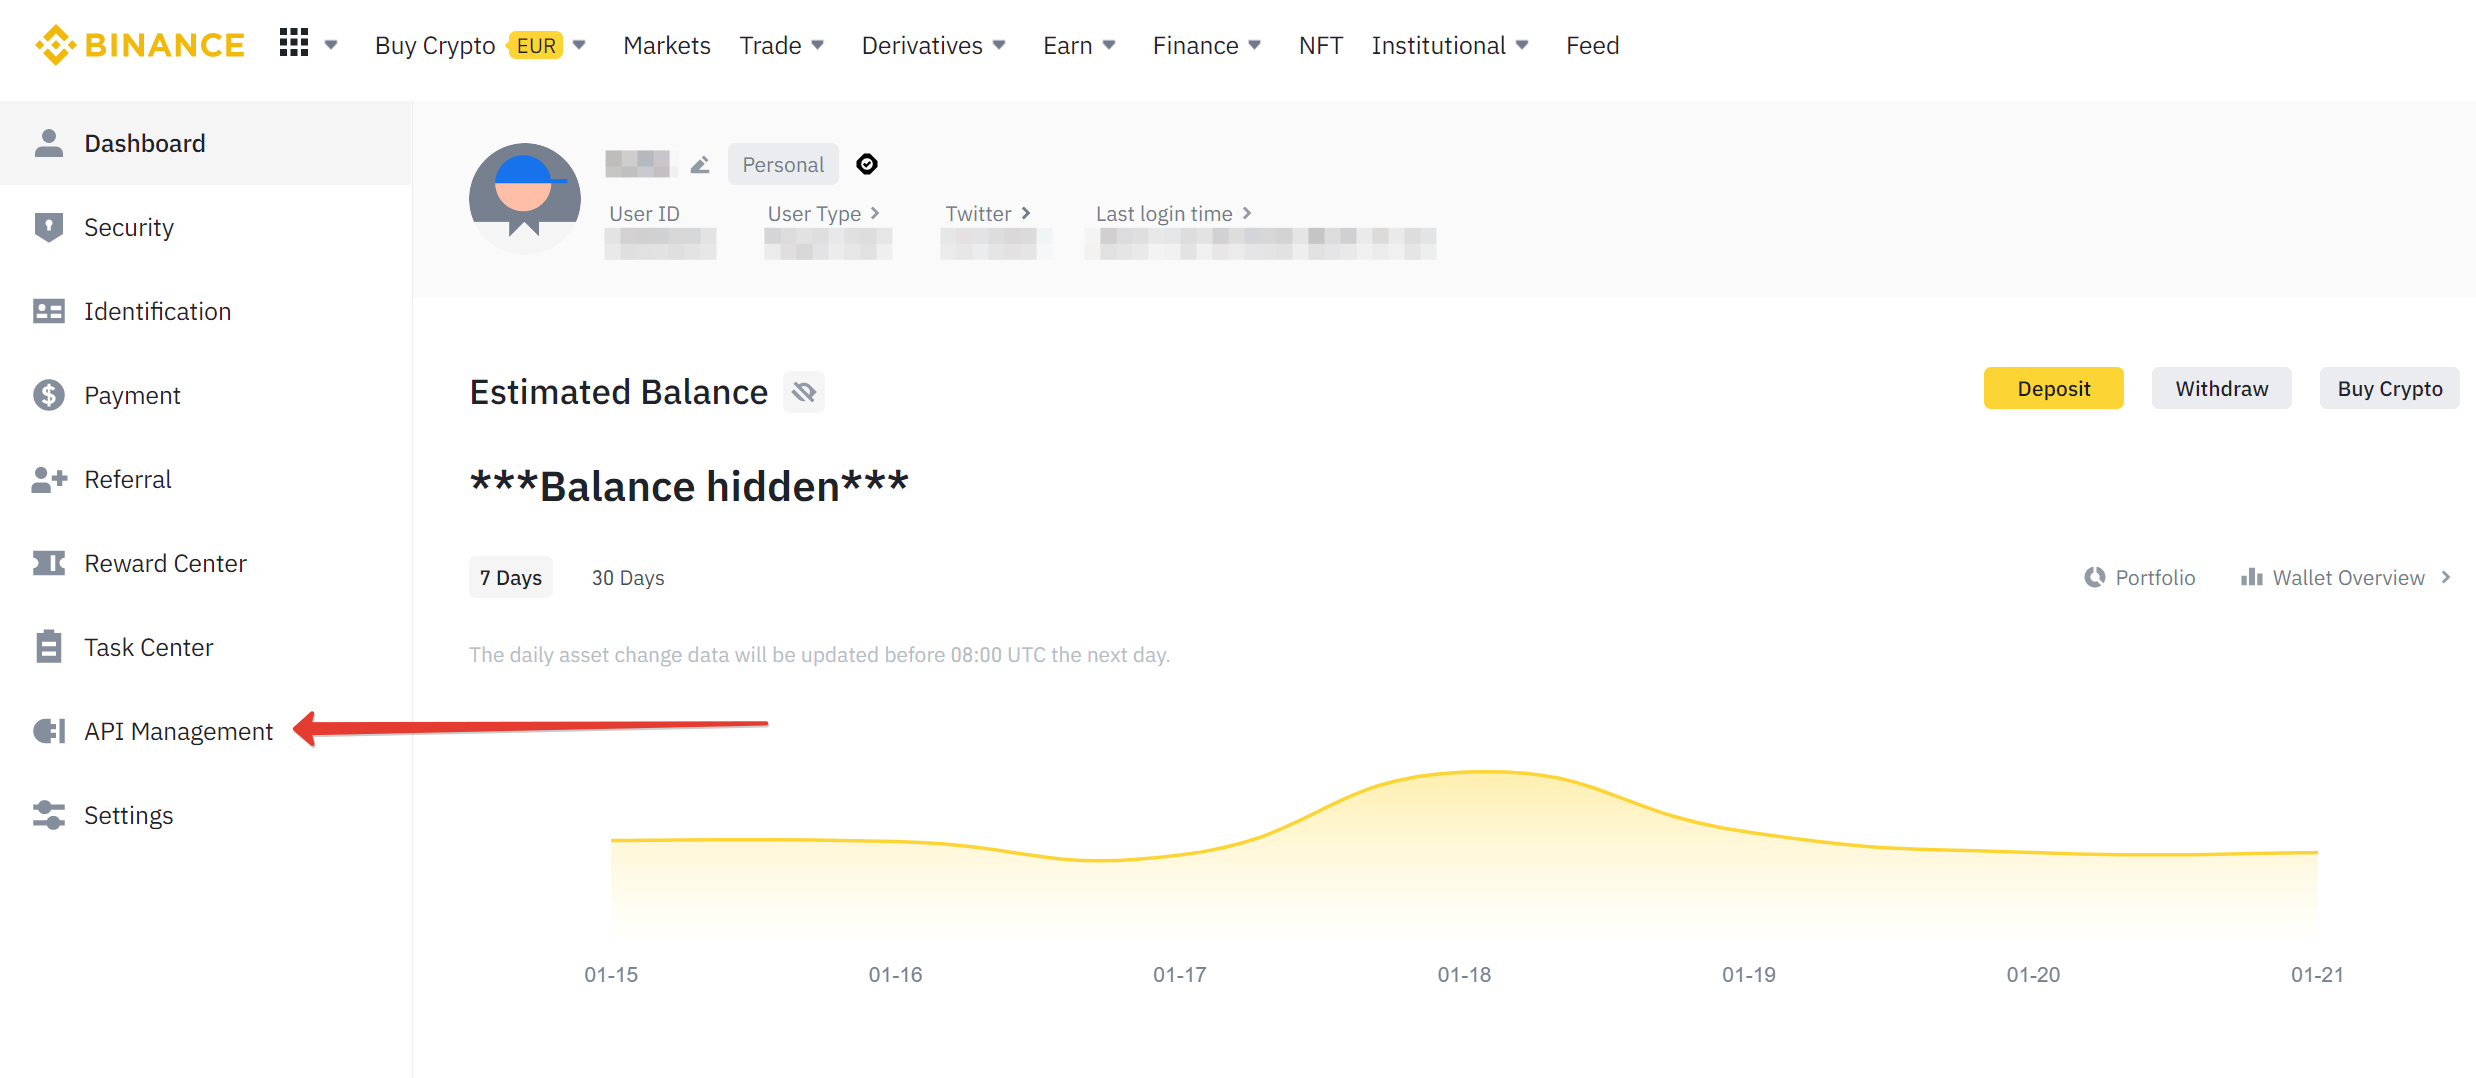
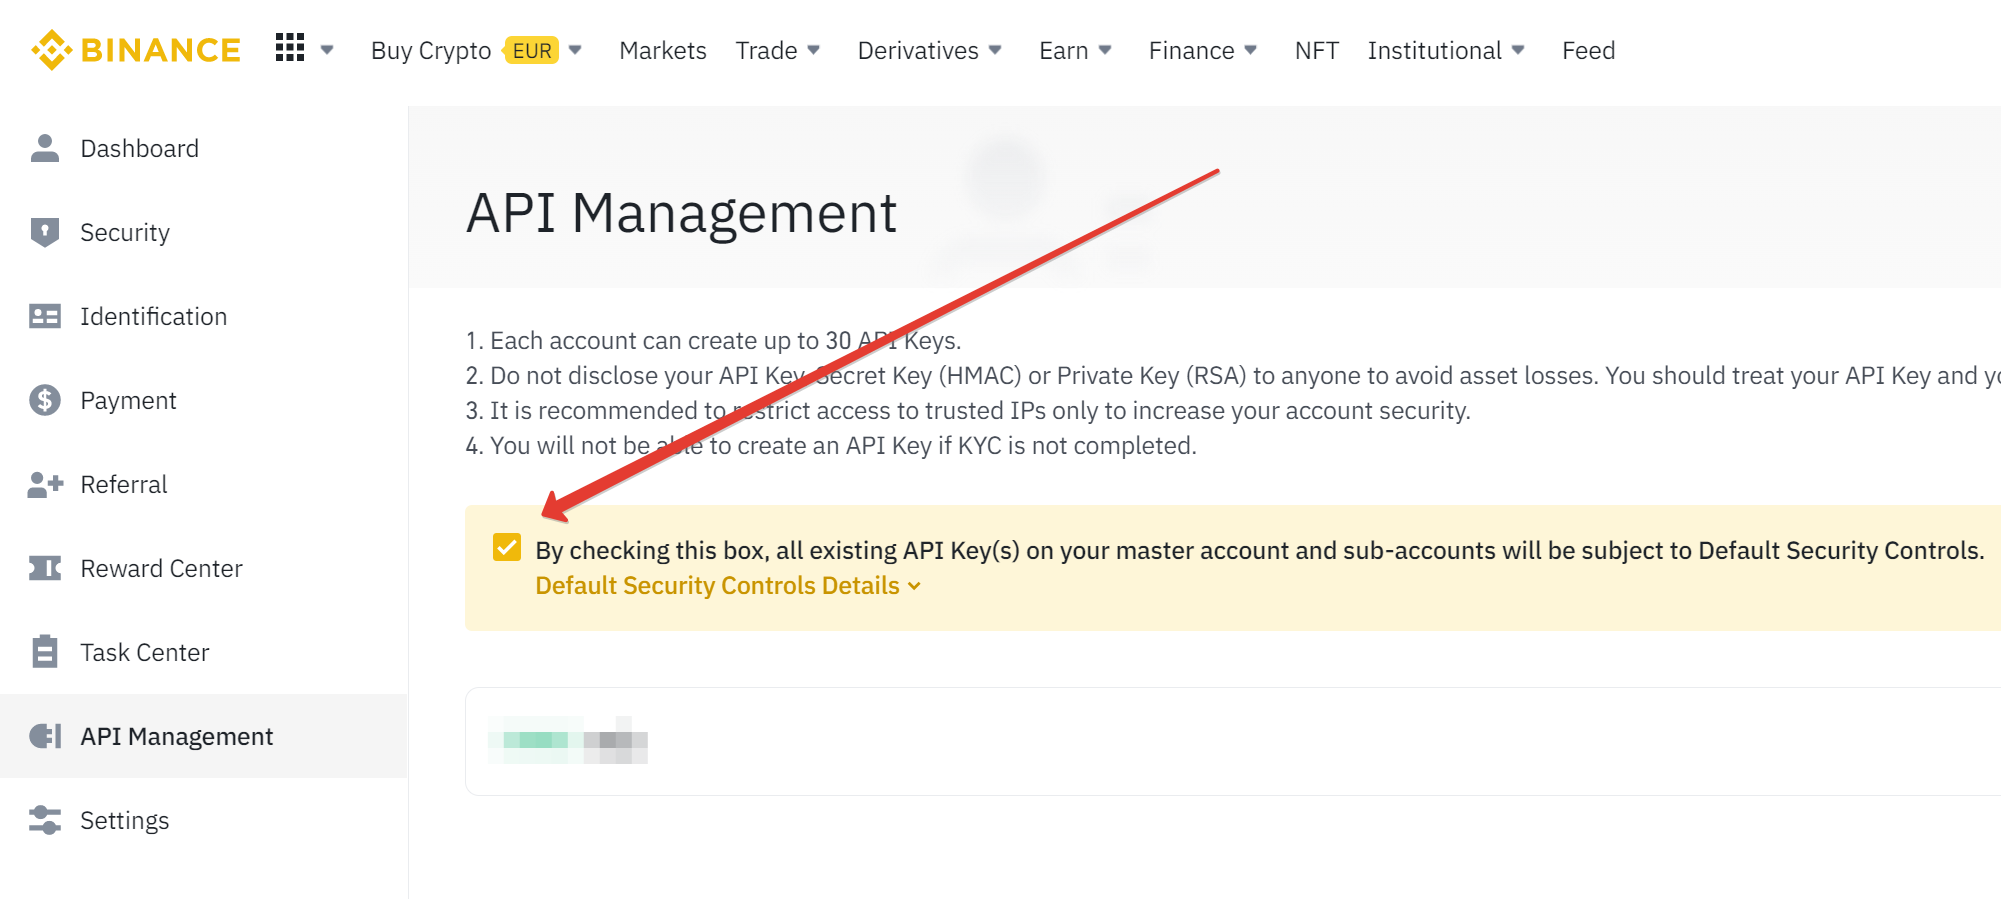
Creating an API key for trading on Futures USDT-M standard way
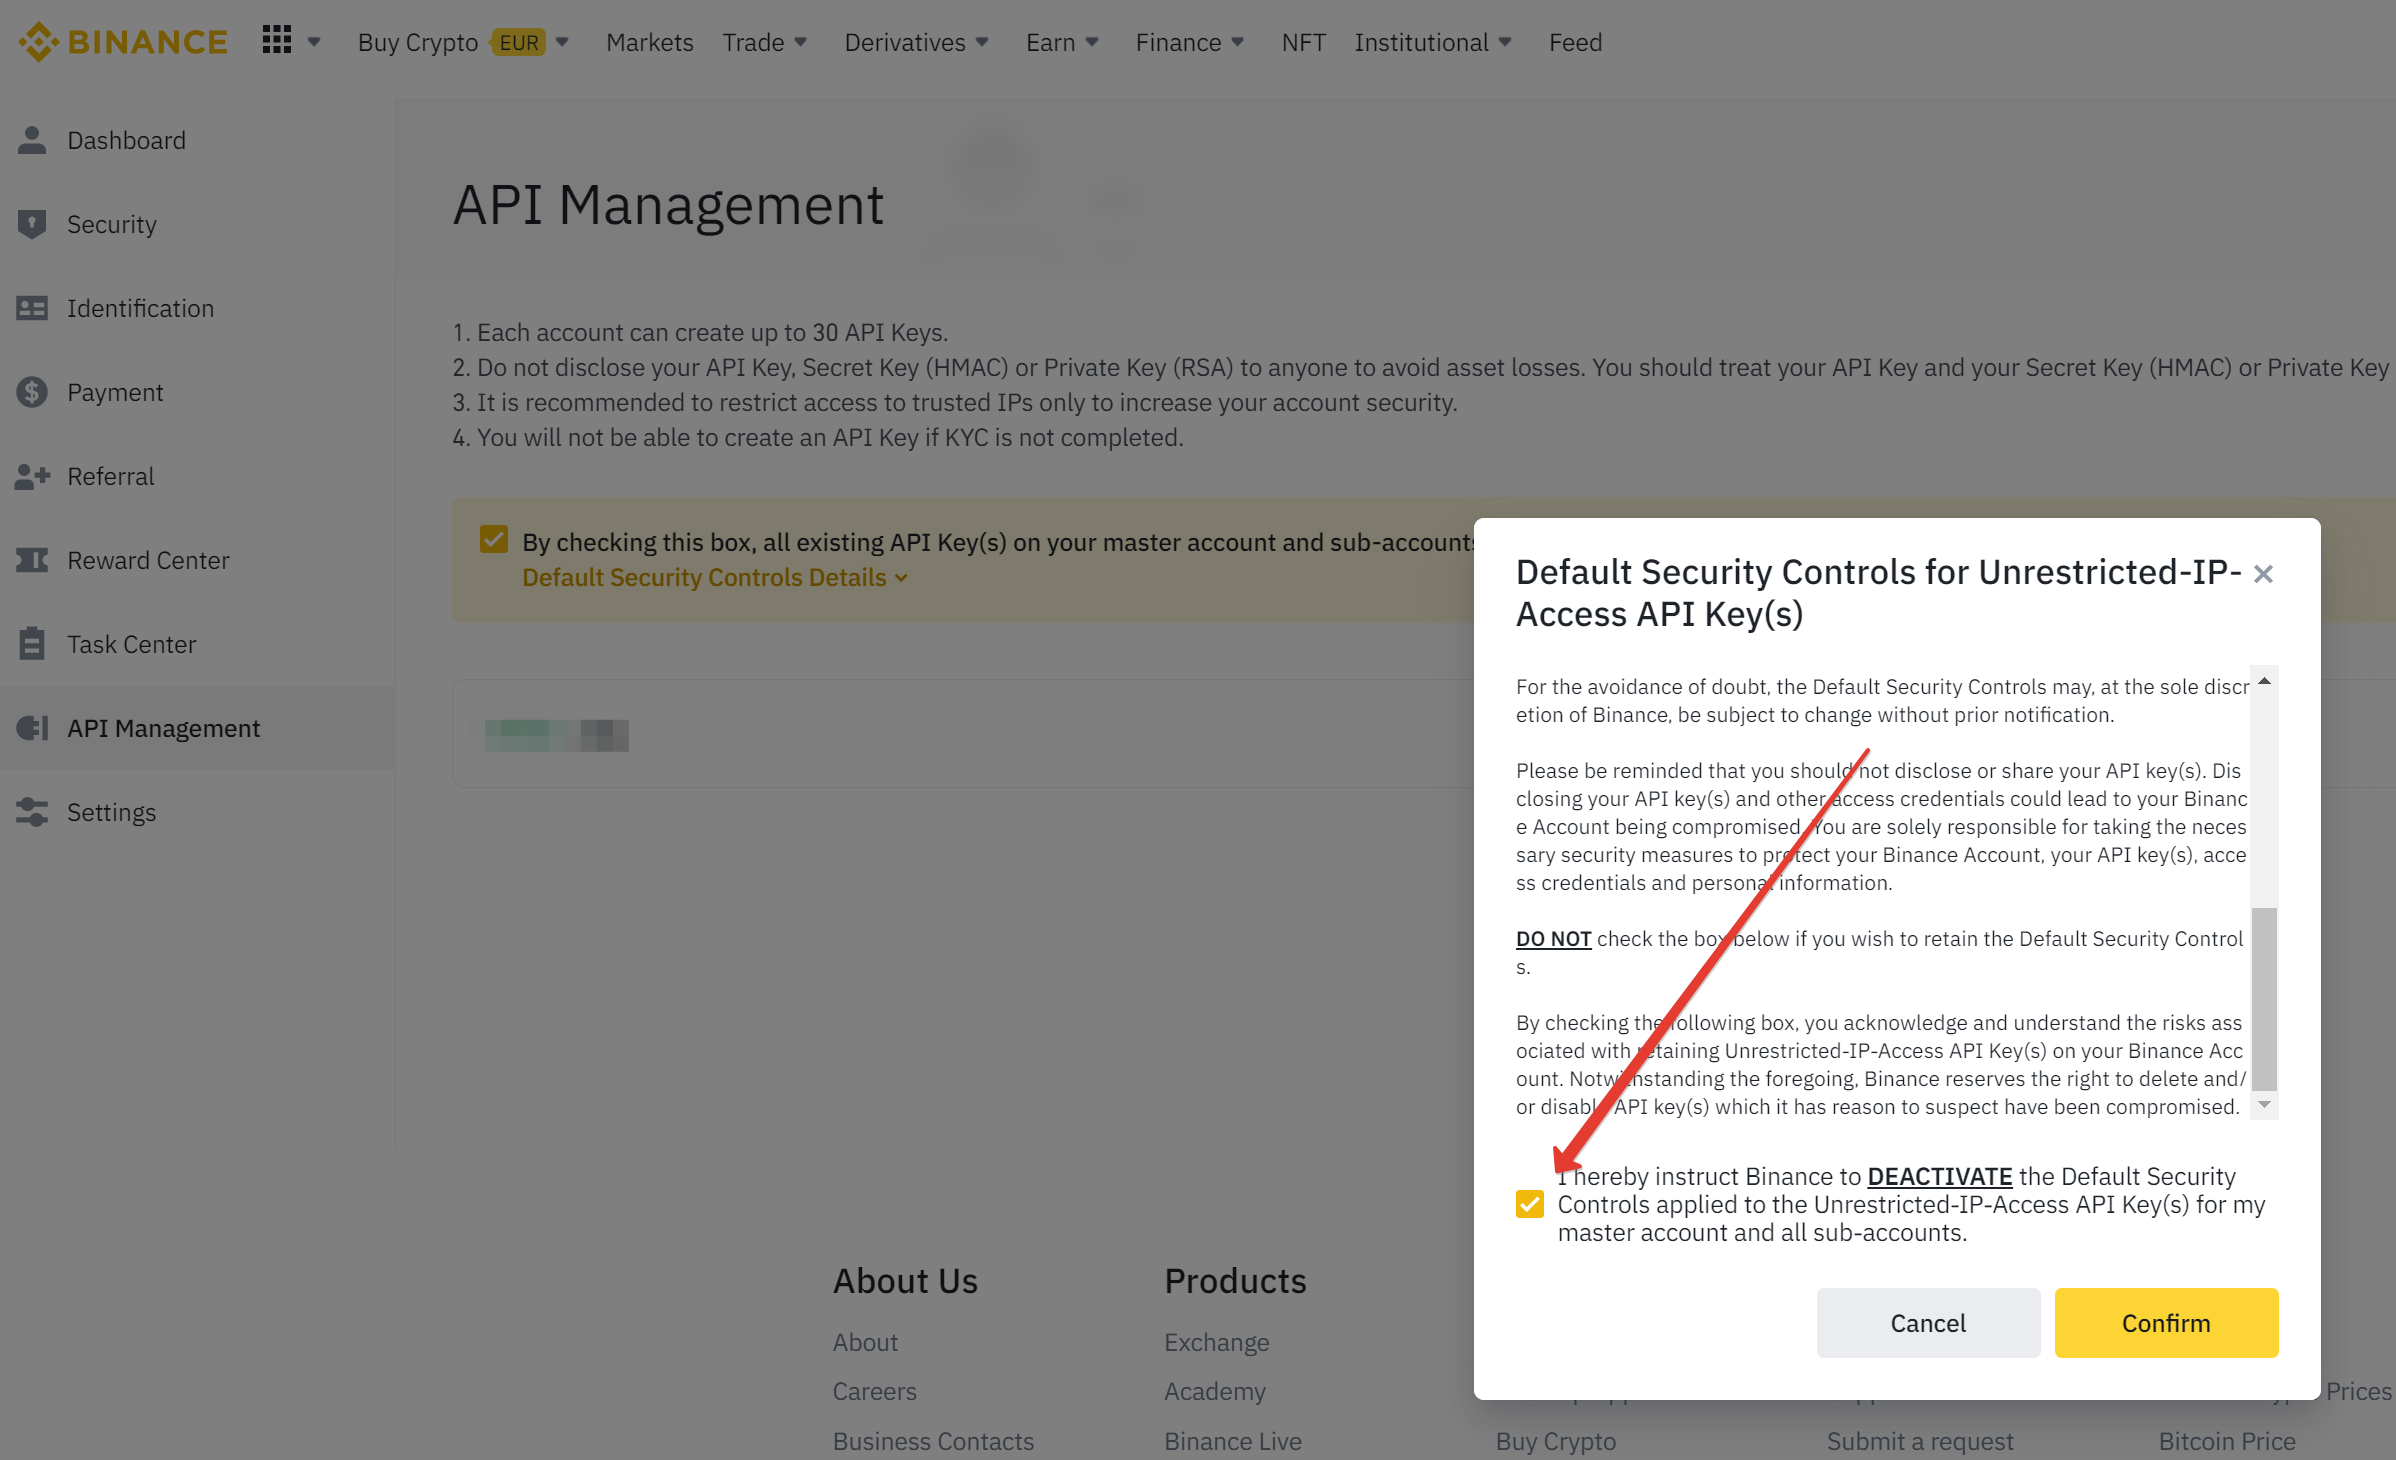
- Next, you need to remove the "Default Security Controls" checkbox;
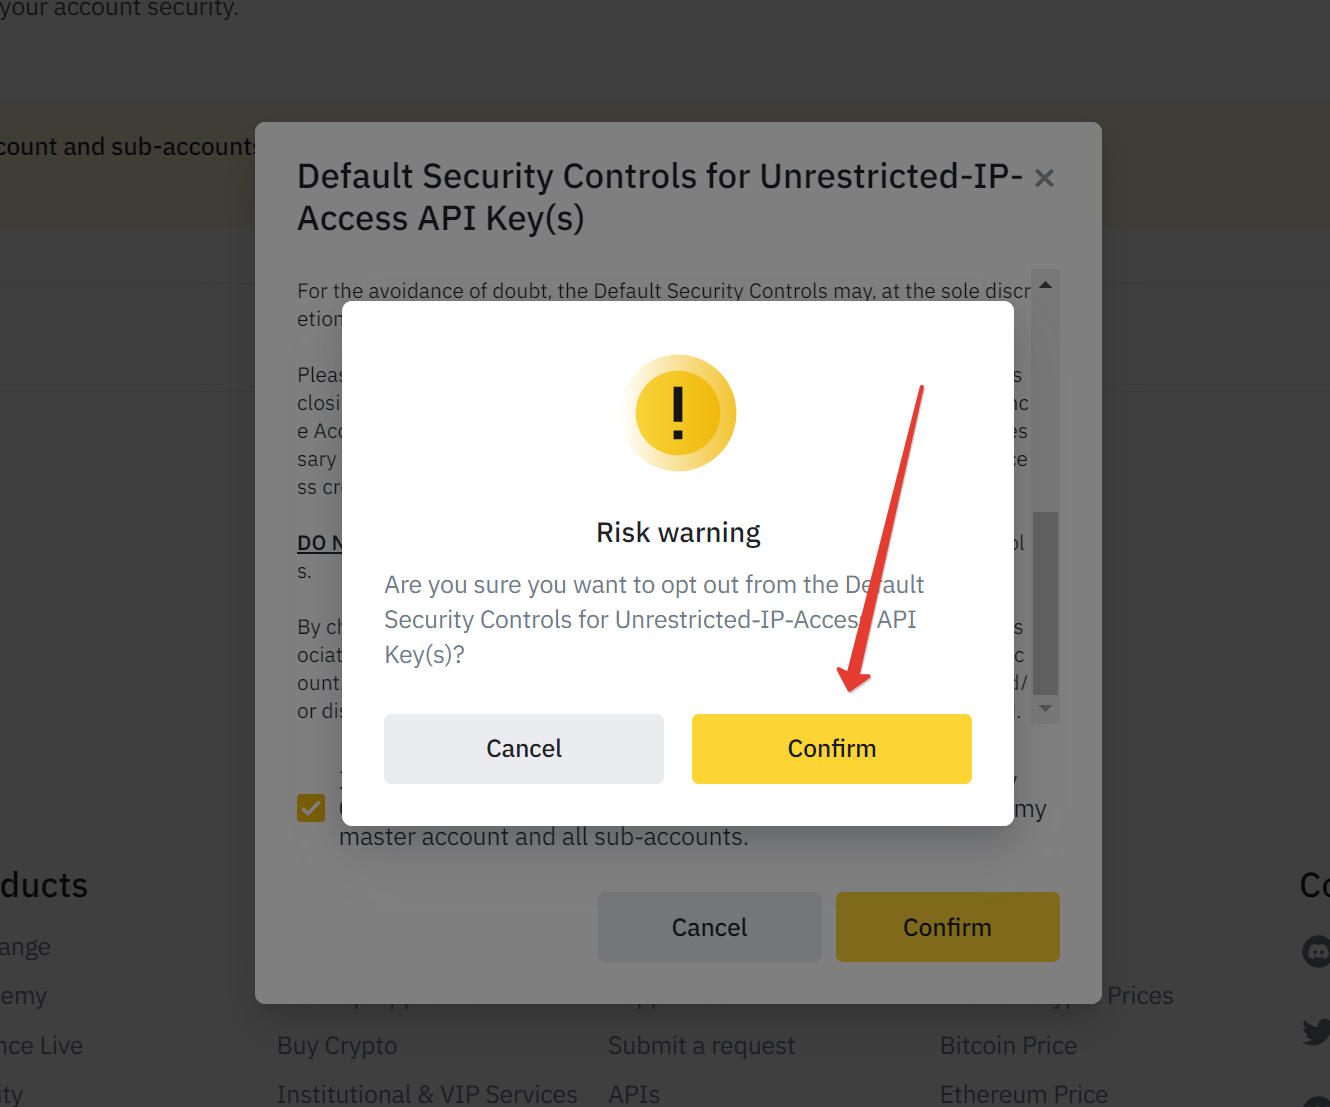
- In the pop-up window, you need to confirm that the "default security controls" is disabled;
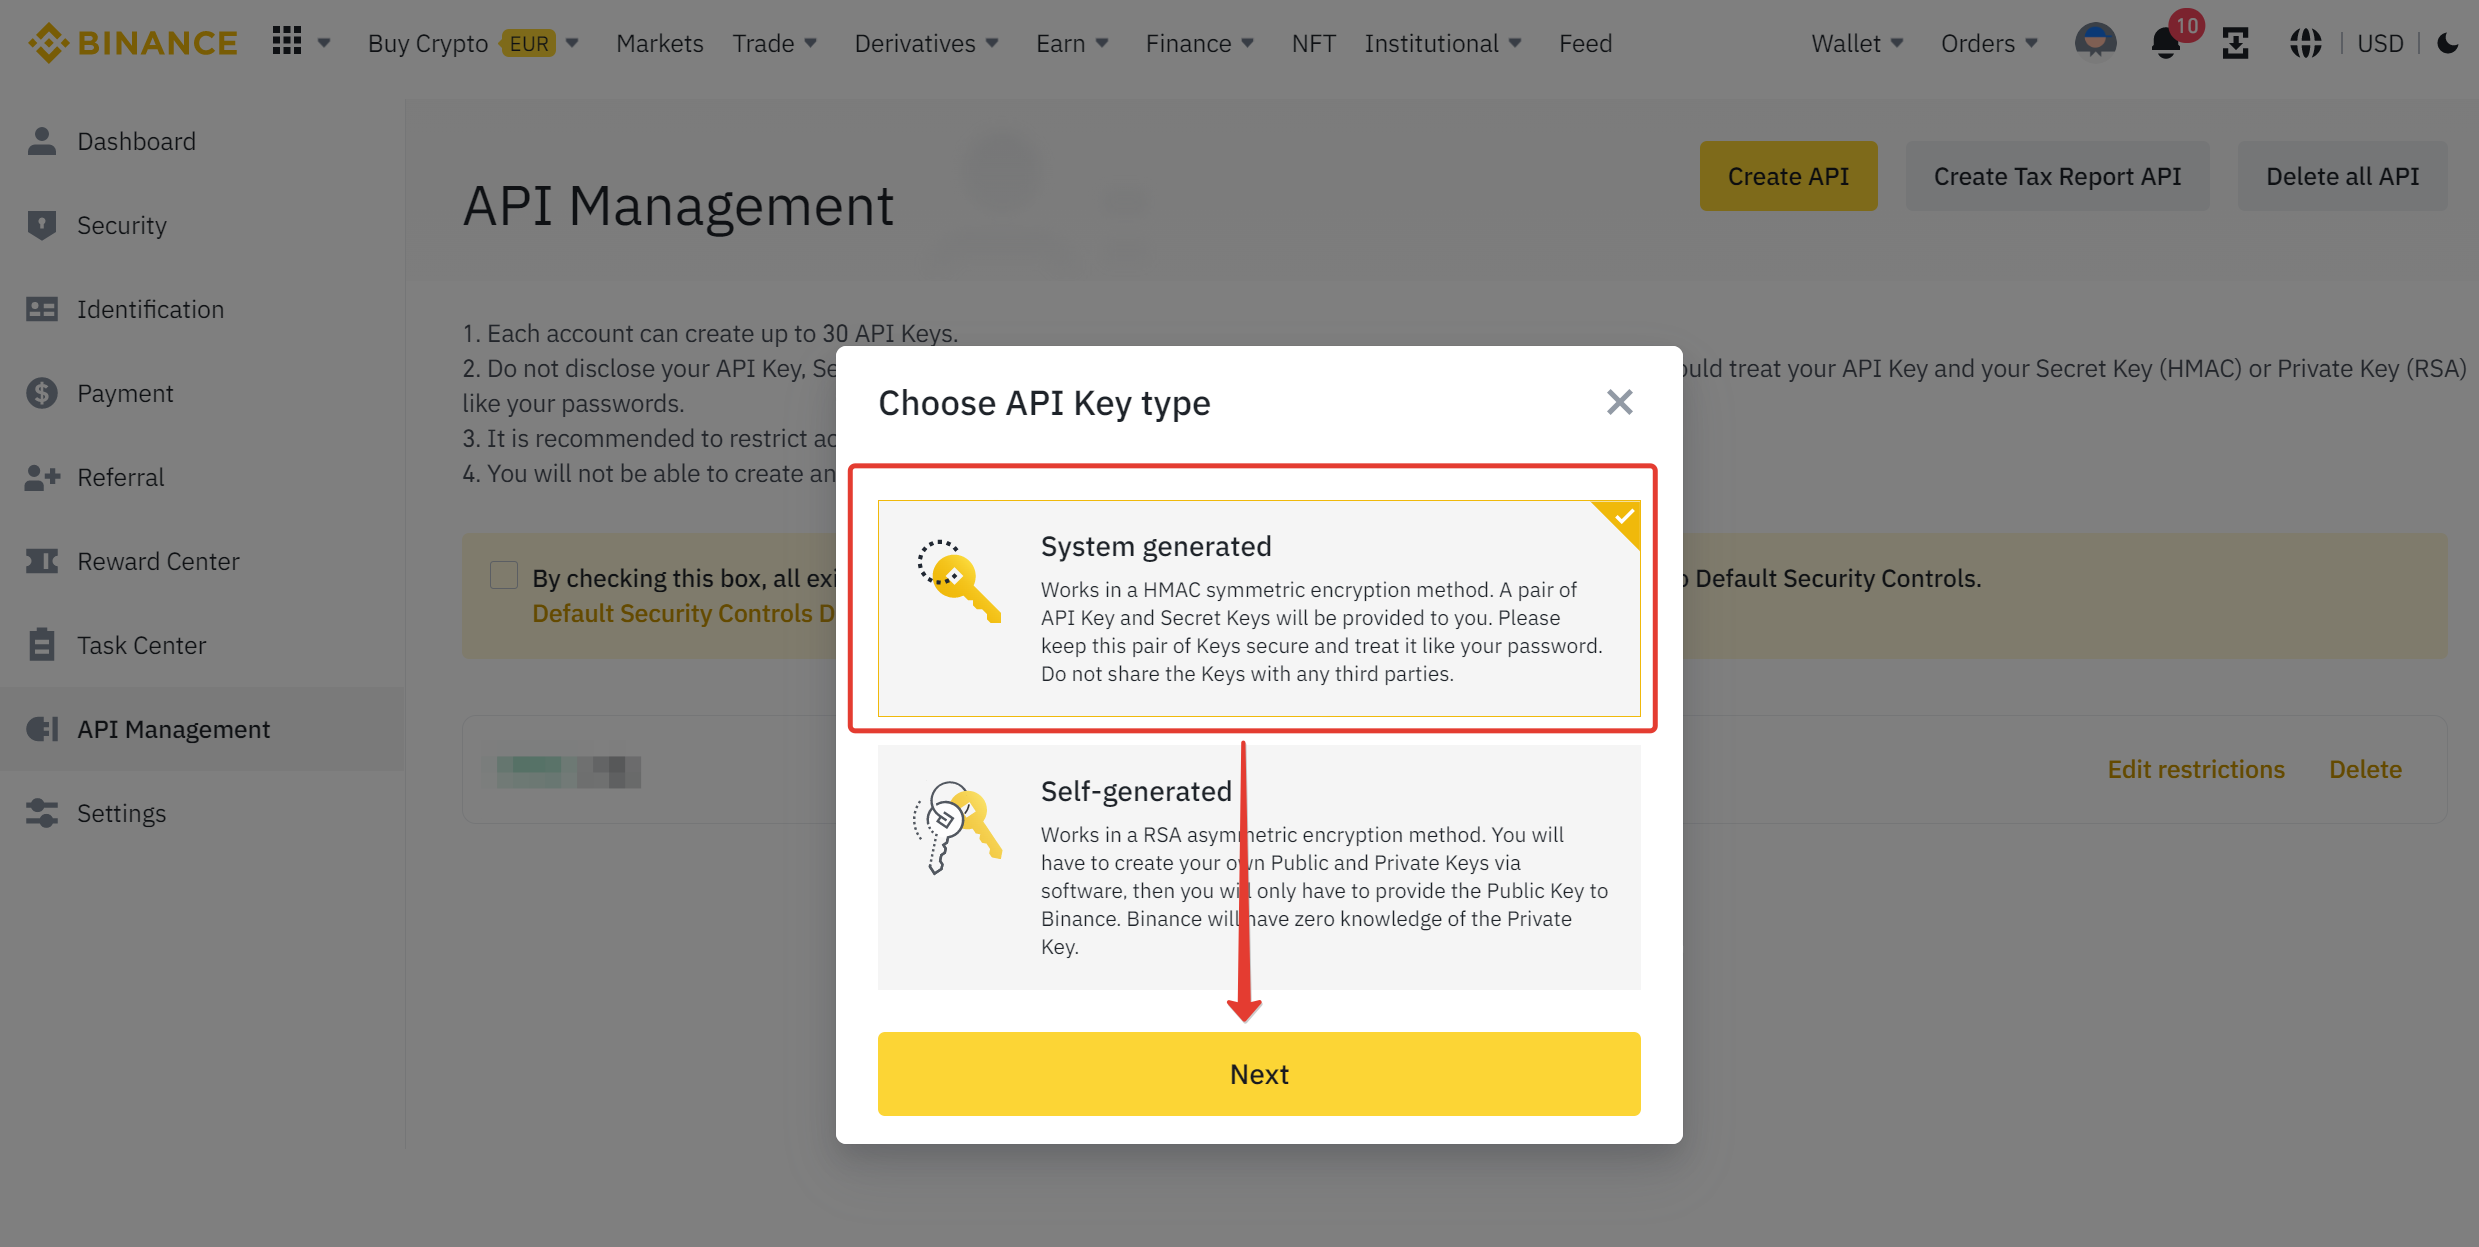
- Next, click "Create API" and select the key type "System generated";
- We set the label of the API key;

- Passing a security check;

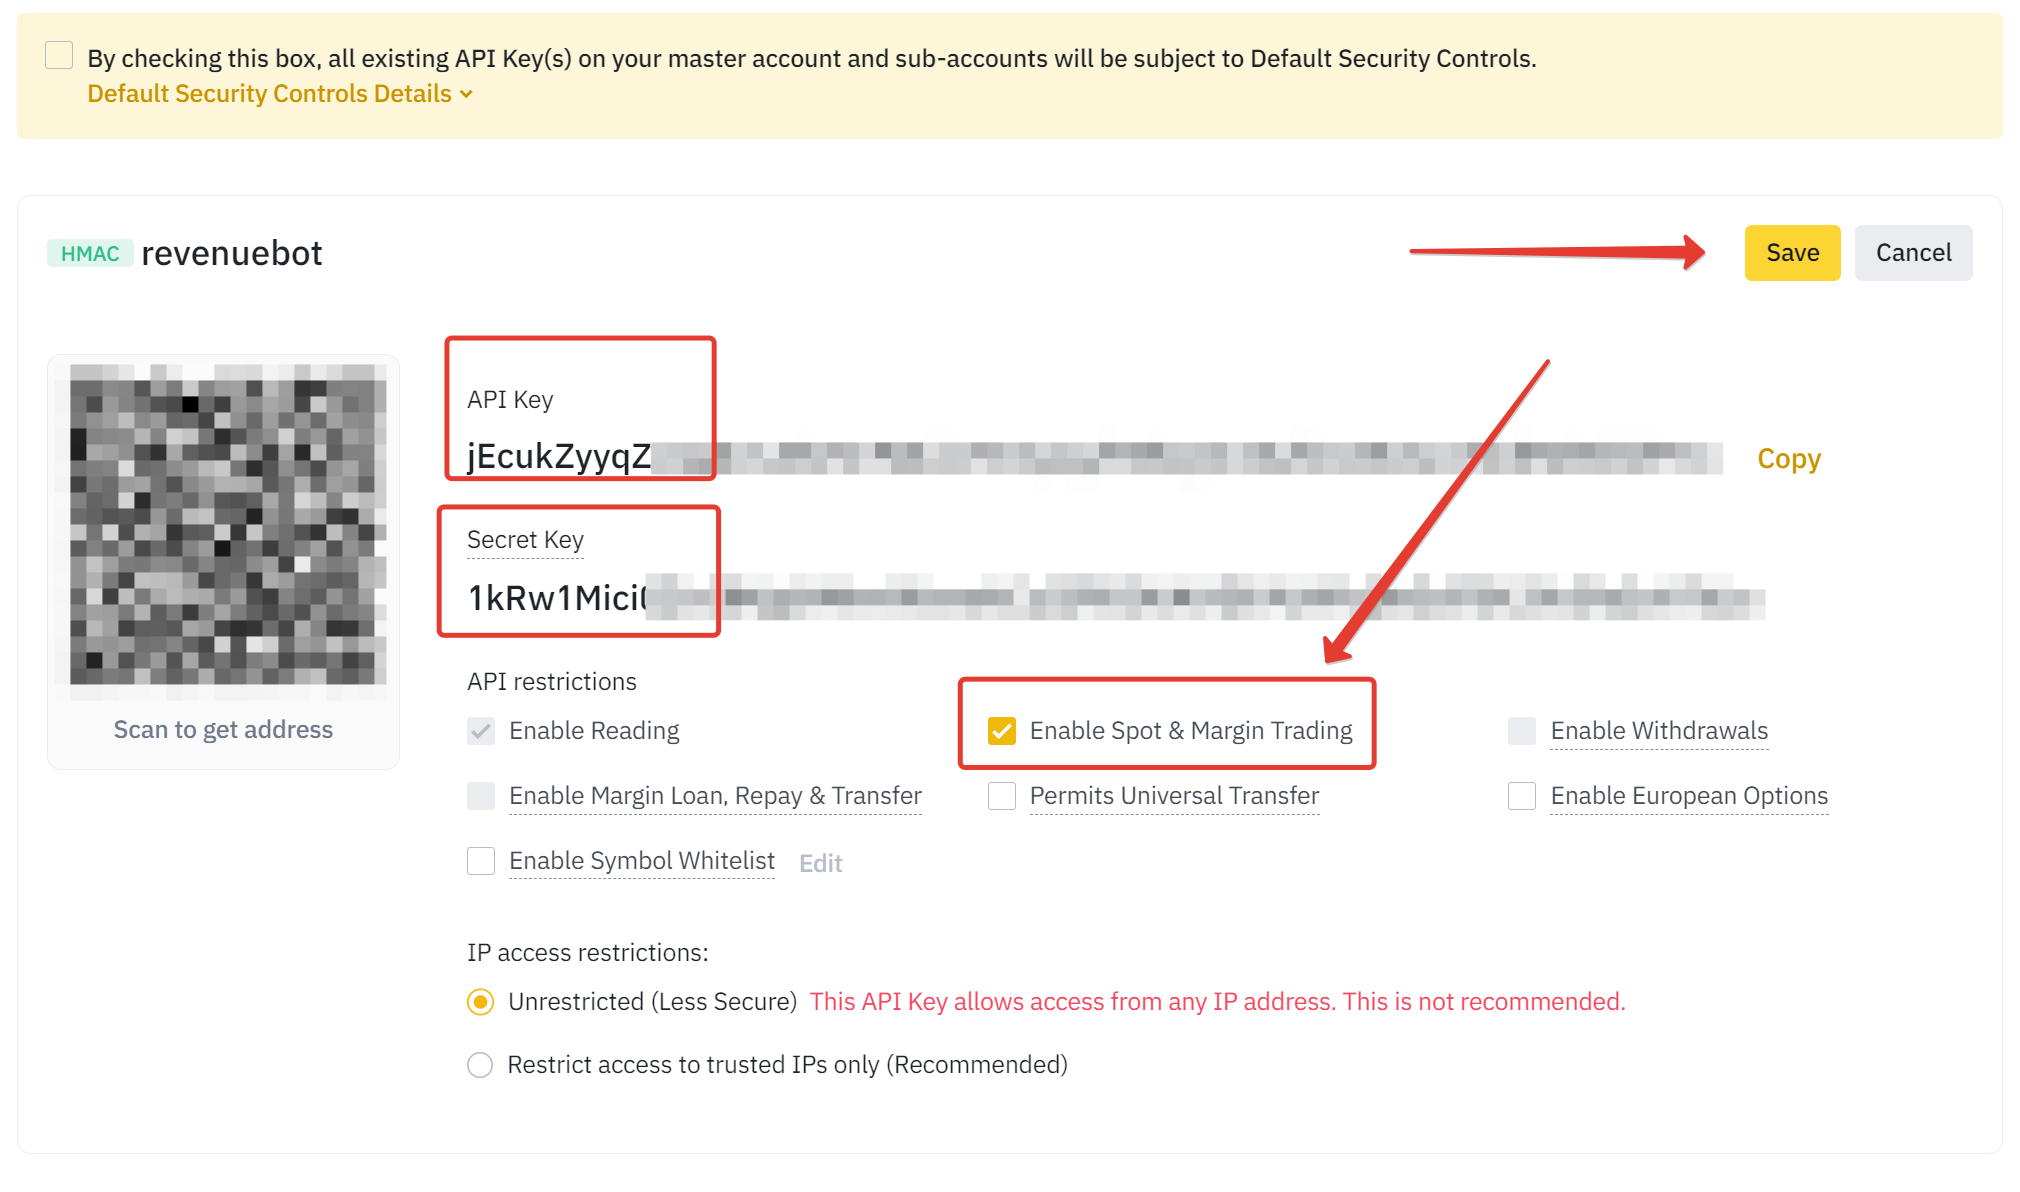
- Activate the restriction "Enable spot and margin trading", set IP access to "Unrestricted", save the API Key and Secret Key (they will be needed when adding a key for the RevenueBot), then click Save;
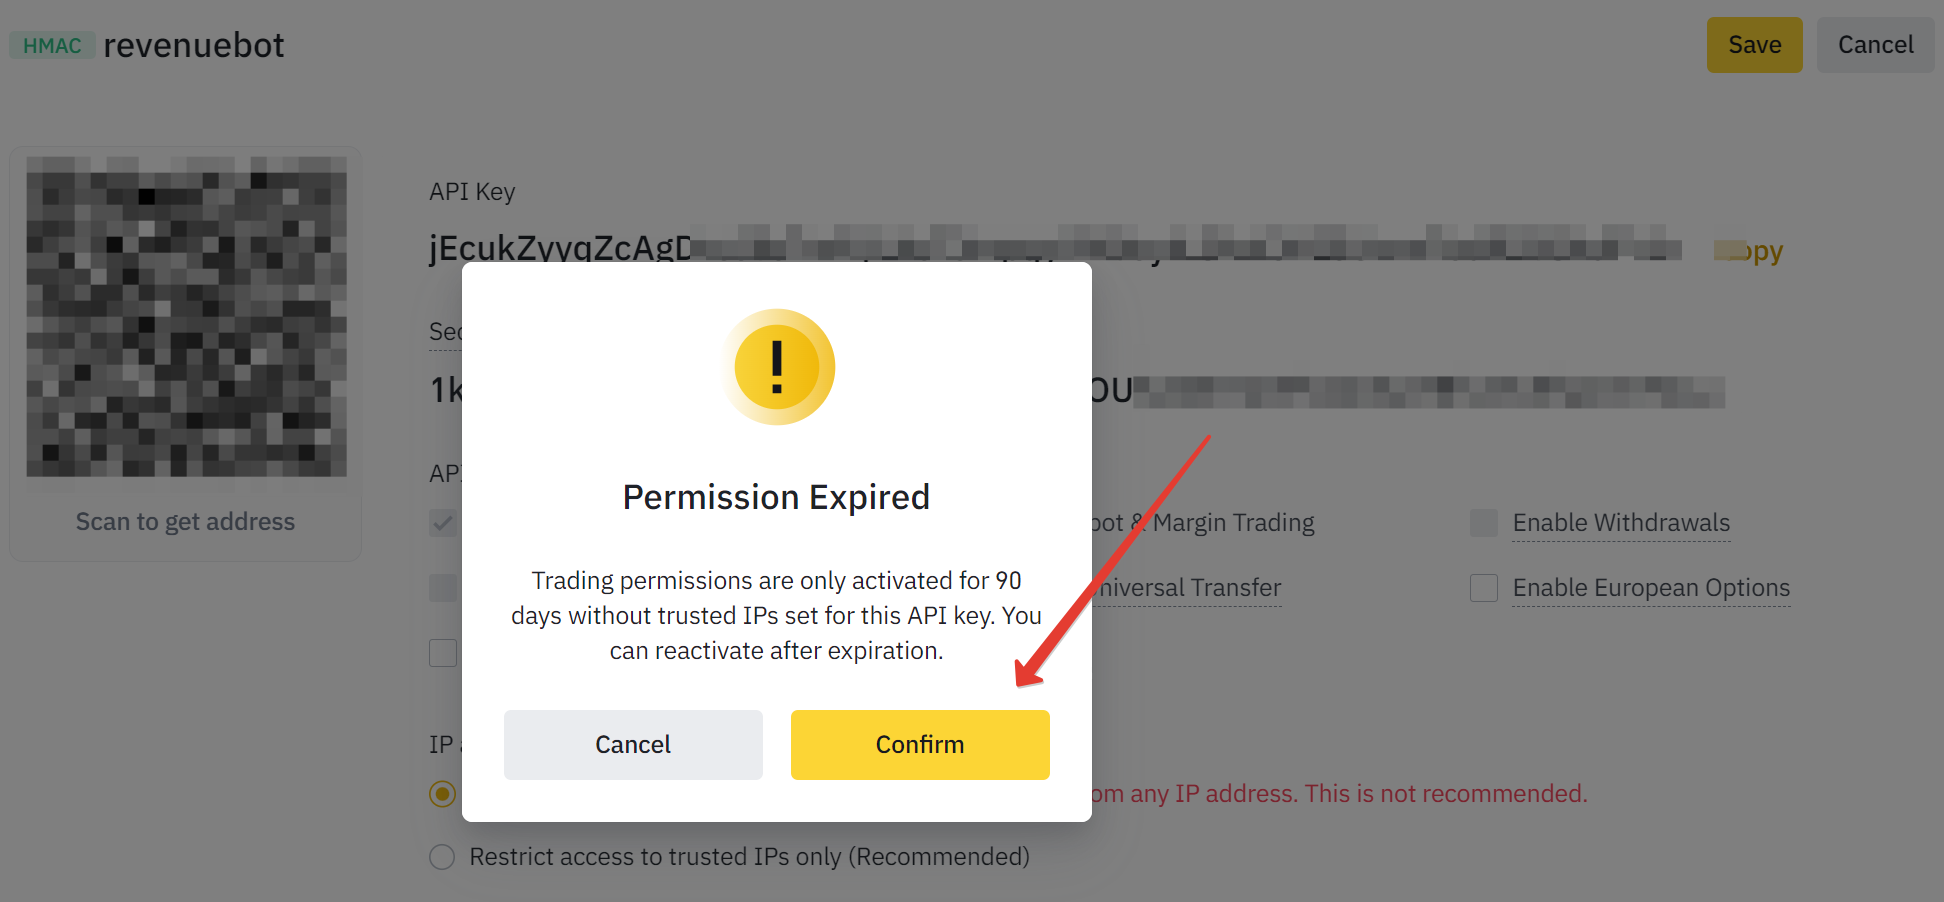
- We confirm the validity period of the API key;
5. Adding an API key to RevenueBot
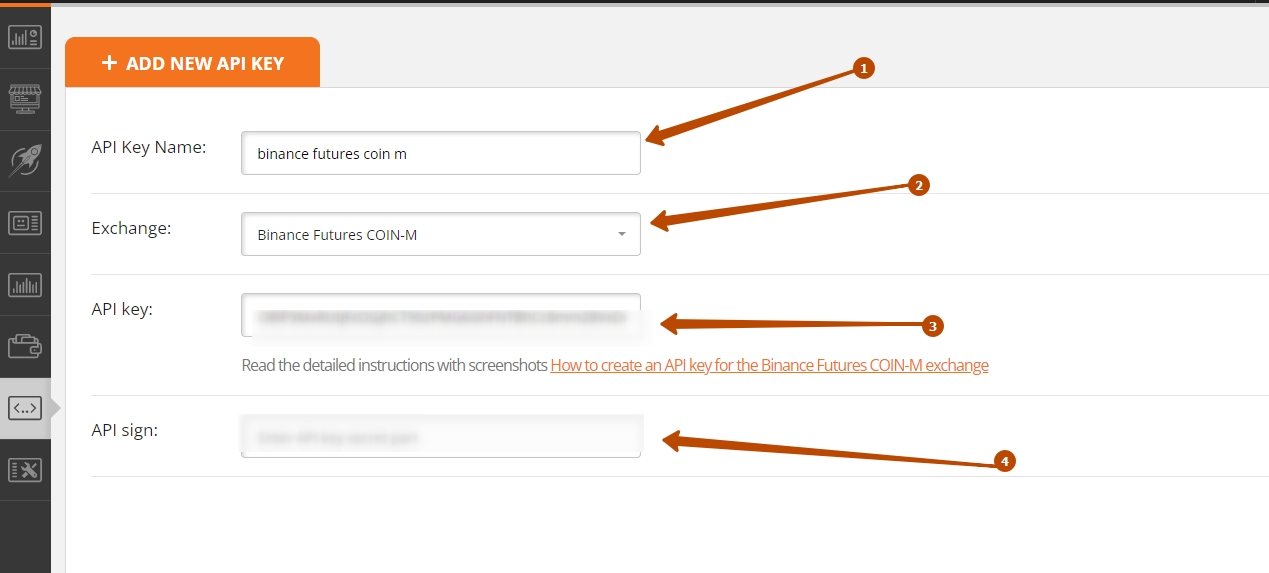
- Go to the “API keys” menu and click “Add API key”;
- Come up with a name for the key, for example, “futures margin usdt”. In the exchange field, select “Binance Futures USDT-M”, copy the terms “API Key” and “Secret Key” in the corresponding fields and click on “Add API key”.
6. Creating a bot for USDT-margin Binance Futures using the “Quick start” menu
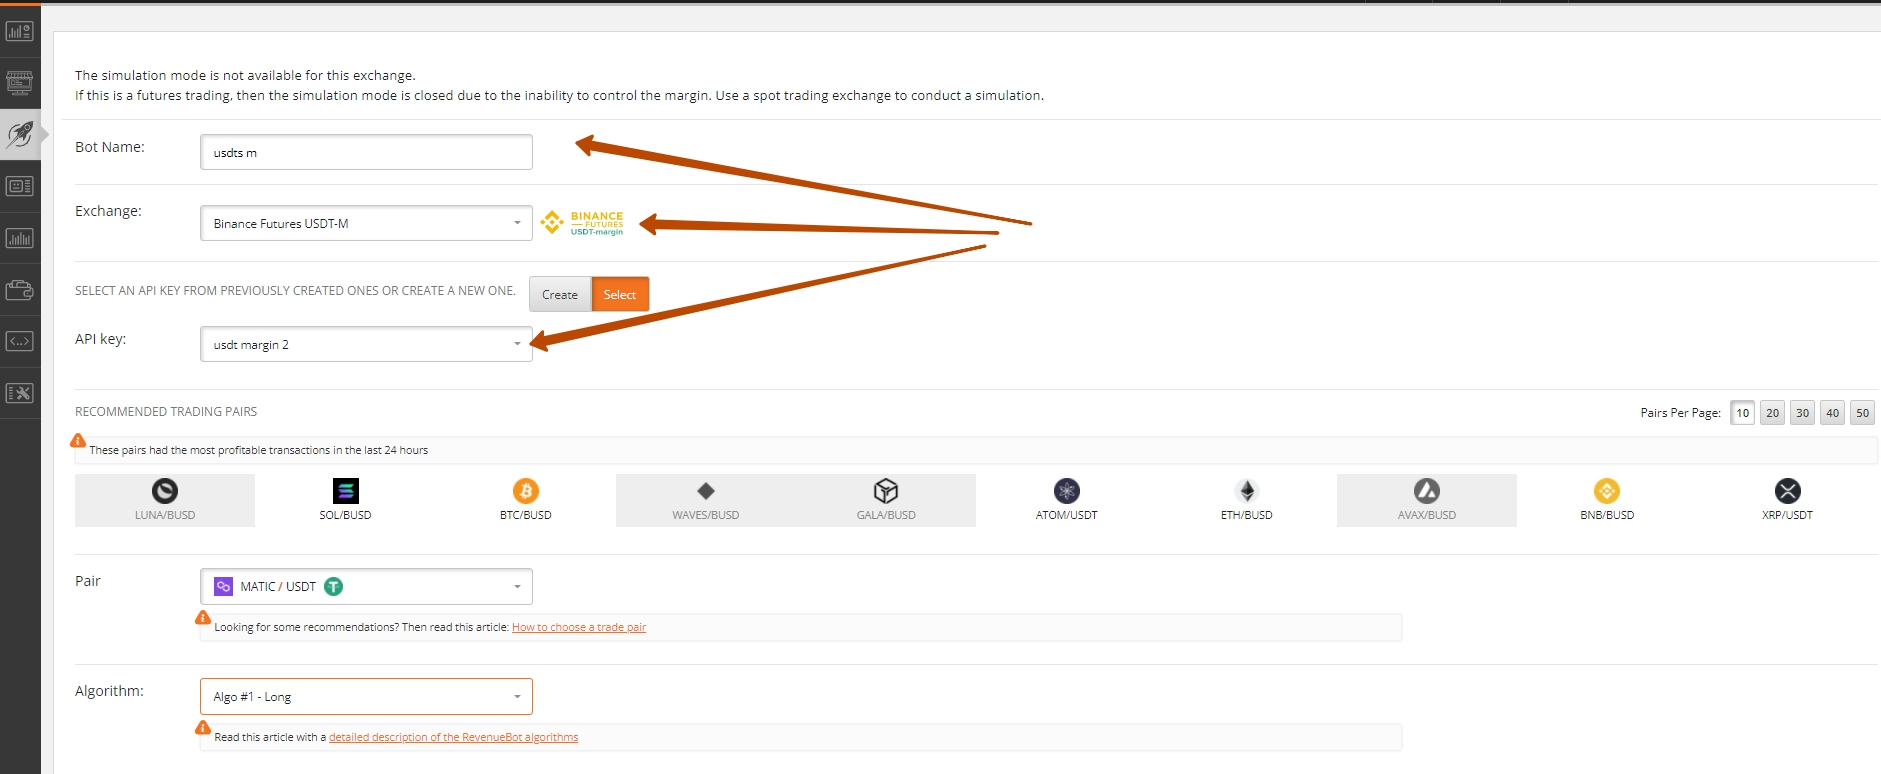
- Go to the “Quick start” menu
- Come up with a name for the bot
- Select the exchange “Binance Futures USDT-M”
- Select the previously created API key for futures trading or create a new one
- Select a trading pair. Futures trading is only possible on the USDT market. You can also use the convenient menu of recommended pairs. This menu shows the trading pairs that had the most profitable trades in the last 24 hours
ATTENTION! Do not run multiple bots in the same trading pair at the same time. This can lead to errors in the operation of bots, because the open position will not be fully controlled by any of the bots.
- Select the algorithm
LONG — buying cryptocurrency futures for USDT, and then selling them at a higher price. The profit is available only in USDT. Using the long algorithm is beneficial in a bullish trend.
SHORT — selling cryptocurrency futures for USDT, and then buying them at a lower price. The profit is also available possible only in USDT. Using the SHORT algorithm is advantageous in a bearish trend.
- Set the bot with a Deposit
Remember, the Deposit can only be set in USDT for both LONG and SHORT algorithms. The profit is also possible only in USDT.
- Set the leverage
Setting the leverage is essentially a multiplication of your depot (borrowed funds from the exchange). Thanks to these borrowed funds, you get the opportunity to increase the volume of your trading operations and profit.
Don’t be greedy and don’t use maximum leverage, it’s very risky. Be sure to keep insurance funds on the futures account that are not involved in trading until the right moment. This will make it possible to get profit in the open position.

- Set the position mode
By default, the exchange has a “one-way position mode”. Use this mode when configuring the bot if you don’t know which one to choose.
In one-way mode, a position can only be opened in one direction for one trading pair at a time (this is either a SHORT or LONG position).
Read more here Position mode
- Set the number of insurance orders and the martingale
The Deposit must be sufficient to create all insurance orders, and each of the orders must meet the minimum size requirement of the exchange. The martingale determines how many percent each subsequent order in the grid is larger than the previous one. Using a martingale allows you to close a position with profit with a smaller price rebound.
- Enable partial placement of the order grid
Due to the fact that it is not allowed to place orders more than 15% from the current price of the trading pair on the Binance Futures exchange, we recommend that you always use the partial placement of the order grid for futures bots (sets the number of simultaneously active safety orders from the entire grid that the bot will place on the exchange). If the price change overlap of more than 15% is set in the bot, the bot will not be able to place all safety orders in the grid at once. In this situation, enabling partial placement of the order grid will help. The bot will not place the entire grid of orders at once, but only the specified number. After that, the bot will track the placed orders and place new orders when active orders are executed. If you want to find out more information about the partial placement of a grid of orders, see the blog article “Setting the number of active insurance orders”.
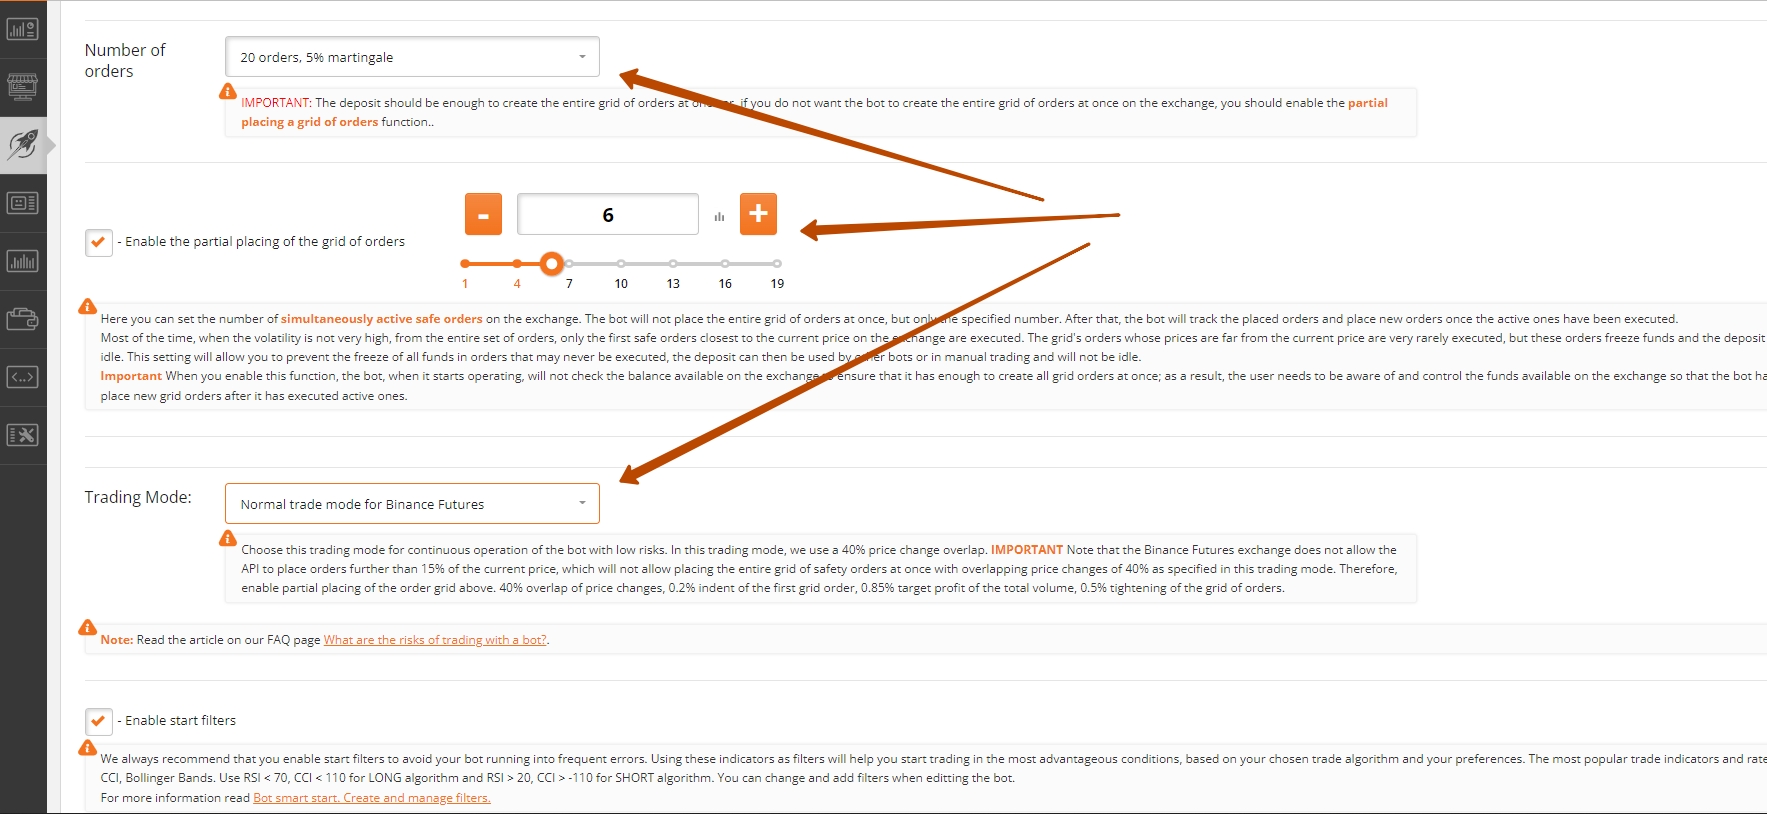
- Select a trading mode
You can choose one of the ready-made templates for bot settings. We recommend using the “normal trading mode for Binance Futures”, which uses a 40% price change overlap, which is suitable for continuous operation of the bot with low risks.
We remind you that you must enable partial placement of the order grid (sets the number of simultaneously active safety orders from the entire grid).
There is also an aggressive trading mode, with a 15% price change overlap. It is suitable for temporary trading when there is time to monitor the bot’s work. It allows you to get more profit, but at the same time, the risks increase.
- Using filters to start the bot
We recommend always using filters to start the bot. This is necessary so that the bot starts trading at the right time (not buying at an overbought market and selling at an oversold one). That’s why popular and effective trading indicators such as RSI, CCI, and Bollinger Bands are used. We use RSI < 70, CCI < 110 for the LONG algorithm, and RSI > 20, CCI > -110 for the SHORT algorithm. You can change or add new filters for the start when editing the bot.
Read more about filters in our blog “Bot smart start. Create and manage filters.”
- Create a bot / Create and edit a bot / Create and launch a bot

Select the “Create bot” option, if:
— you don’t understand fine-tuning yet and want first to see how the bot trades with popular and suitable settings for most cases;
— you don’t want the bot to be launched yet, but you want to get acquainted with additional information about the service.
The bot will be created, and the user will be able to get acquainted (before launching the bot) with all the information about how to continue working with the bot: where to view the created bots and make more subtle settings, links to the articles “how to manage the bot” and “see statistics of its work”.
Select the “Create and edit bot” option, if you are familiar with the bot’s fine-grained settings and want to adjust them.
The bot will be created, and the user will have access to fine-tuning (recommended for experienced users who know what they are doing and how the bot works).
Select the “Create and launch bot” option, if you want to quickly create and launch a bot with the settings that are suitable in most cases. The bot will be created and launched. You can also find information on how to continue working with the bot: where to view the created bots and make more subtle settings, links to the articles “how to manage a bot”, and “see statistics of its work”.
7. Fine-tuning the bot
You can set fine-tuning options:
— when creating a bot for Binance Futures in the classic “Bots” menu;
— when you click on the “Create and edit” button in the Quick start menu, after the main bot settings are set.
The main settings:
- Price change overlap: The percentage of price change overlap sets how much the order grid will cover the price change. In fact, this setting states how many percent of the current price will be defended by the last order in the grid.
- Indent of the first order %: Indent of the first order in %. It sets how many percent the first order’s price in the grid will be less than the current price (for the LONG algorithm) or more than the current price (for the SHORT algorithm).
- The price on the stock exchange: Selection of the rate on the exchange from which the order grid will be calculated. These can be BUY, SELL, or AVERAGE rates. We recommend using the SELL rate for the LONG algorithm and the BUY rate for the SHORT algorithm.
- Order grid and martingale: here you can set the number of orders in the grid and martingale (by how many percent each subsequent order in the grid will be larger than the previous one). By clicking on the view orders matrix, you can see the calculated grid of orders.
- Profit %: here we set the percentage of profit that will be laid by the bot when calculating the price of the order that ends the cycle (take-profit order).
- Profit coin: this setting is only available for the short algorithm. It sets which of the traded coins will make a profit.
- Grid tightening %: it happens that the bot placed a grid of orders, and the price went in the other direction. It turns out that you need to wait until the price returns, and you can wait a long time. This expectation can be avoided by setting the order grid update to the current price. Here you can set the percentage at which the current grid of orders is canceled and a new one is placed.
- Delay before canceling the order grid for tightening: here you can set a delay in minutes before starting to cancel the current order grid when the Cycle up setting is triggered. This setting allows you to avoid frequent cancellations of the current order grid, when the price has changed in a very short time and returned to the previous level. You can wait for some time to avoid removing the current grid of orders in vain.
- Delay before canceling the order grid for tightening: here you can set the delay in minutes before setting a new grid after canceling the previous grid of orders. This setting also allows you to avoid negative consequences in a situation where the price has changed in a very short time and returned to the previous level.
- Delay after the cancellation of the order grid for tightening: here you can set the delay in minutes before starting a new cycle after the current cycle ends.
Additional settings:
- Profit capitalization: When making a profit, you can add it to the Deposit that the bot uses, thus increasing the Deposit.
When this setting is enabled, all the bot’s operation’s profit is credited to the virtual wallet that this bot uses.
- Logarithmic distribution: Usually, the order grid is calculated so that all orders in it are located linearly, at the same distance from each other across the entire price overlap. If the price fluctuates slightly, the first orders in the grid, which are the smallest in volume, will be executed most often. If you want to attract more deposits to trading with small price fluctuations, you can use a logarithmic distribution that will increase the order density near the current price and lower the order density when moving away from the current price. The order density can be adjusted differently for different situations by increasing or decreasing the logarithmic factor. For most cases, the value logarithmic factor = 1.5 is suitable. By clicking on the view orders matrix, you can see the calculated grid of orders.
- Price limit: Use this setting to avoid starting to buy too expensive and start selling too cheap.
It sets the maximum price above which the bot will not start a cycle for the long algorithm and the minimum price below which the bot will not start a cycle for the short algorithm.
- Fix the first partially executed order with a profit: it happens that the first order in the grid was partially executed, but the price went in the other direction. This happens when the bot operates a large depot and orders in the grid are quite large, even the very first one. In such a situation, you can wait a long time for the price to return and the order to be fully executed so that the algorithm continues to work. By enabling this setting, you can set the profit percentage for calculating the price at which we will get a profit if we cancel a partially executed order and set the final cycle order for its amount. After all, the price went in the direction where we will get a profit, but the order has turned out to be too large.
- Automatic algorithm flipping: depending on certain conditions, the bot can stop the current active cycle, cancel all active orders, including take profit, and then transfer the Deposit received from the work to the wallet of another bot (with the opposite algorithm) and start it up. Read more in the blog article Automatic algorithm flipping.
- Automatic switching of a trading pair: at the start of the operation, the bot can change the trading pair set in its settings to another one that currently has more suitable volatility indicators for successful trading. A volatility analyzer is used to assess the volatility of cryptocurrencies. It calculates the number of multidirectional price fluctuations over the nearest past time. They select the cryptocurrency, the price of which has changed many times. Read more in the blog article Automatic switching of a trading pair.
We will also analyze the position mode settings.
8. The position mode
In the settings of futures bots, you can set the position mode.
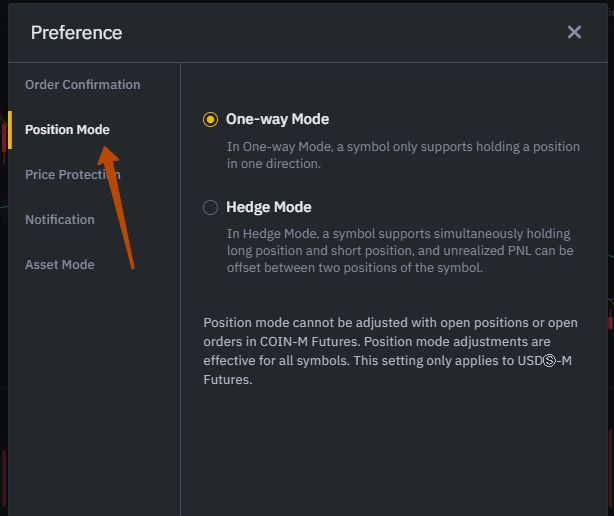
At the moment, there are 2 position modes on Binance Futures. They are “one-way mode” and “hedging mode”.
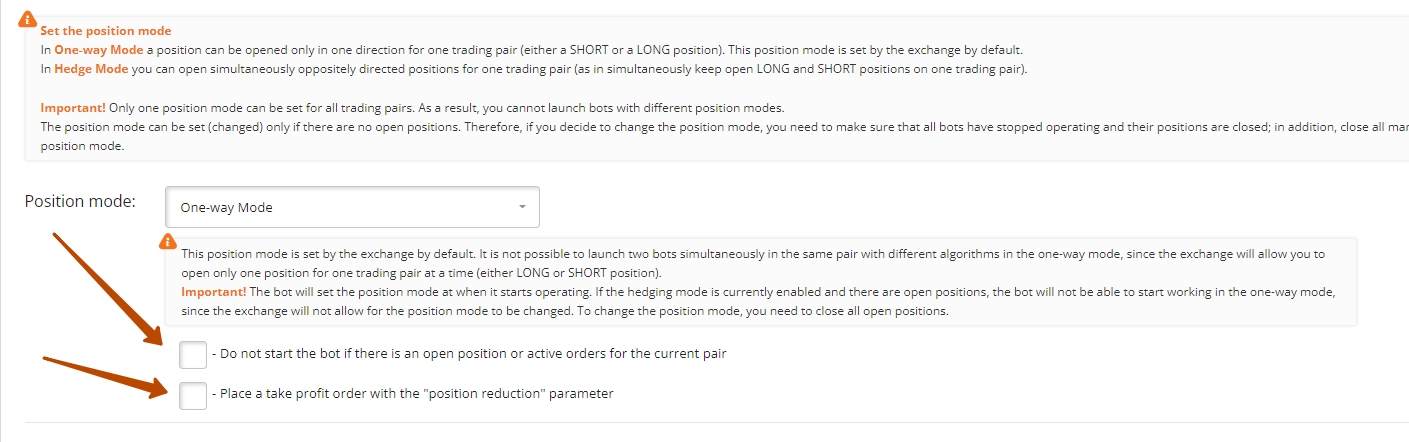
One-way position mode
By default, the exchange sets “One-way position mode”. You should use this mode when configuring the bot if you don’t know which one to choose.
In one-way mode, a position can only be opened in one direction for one trading pair at a time (this is either a SHORT or LONG position).
Two settings have been added for the one-way position mode. We recommend you to turn them on. For most cases, these settings will further secure futures trading.
1) Do not start the bot if there is an open position or active orders for the current pair.
This setting will not allow the bot to interfere with an already started trade by affecting the open position (manually or by another bot). Bots with automatic switching of a trading pair will not be able to enter the same pair.
2) Place a take profit order with the “position reduction” parameter.
This setting will not allow the bot to go beyond the open position or open a position in the opposite direction.
Hedging mode
In hedging mode, you can open independent multidirectional positions for one trading pair at the same time (keep LONG and SHORT positions open for one trading pair at the same time).
This position mode allows you to run two bots simultaneously in the same pair with different algorithms. Two multidirectional positions will be opened, and each bot will only control its own position.

Attention! The position mode is set the same for all trading pairs, so you can’t run bots with different position modes.
The position mode can be set (changed) only if there are no open positions. Therefore, if you decide to change the position mode, you need to make sure that all bots are stopped, and their positions are closed. In addition, you need to close all manually opened positions and only then change the position mode. You don’t need to manually change the position mode on the exchange for the bot to work. The bot checks the startup mode’s position mode and changes it to the one set in the bot settings.
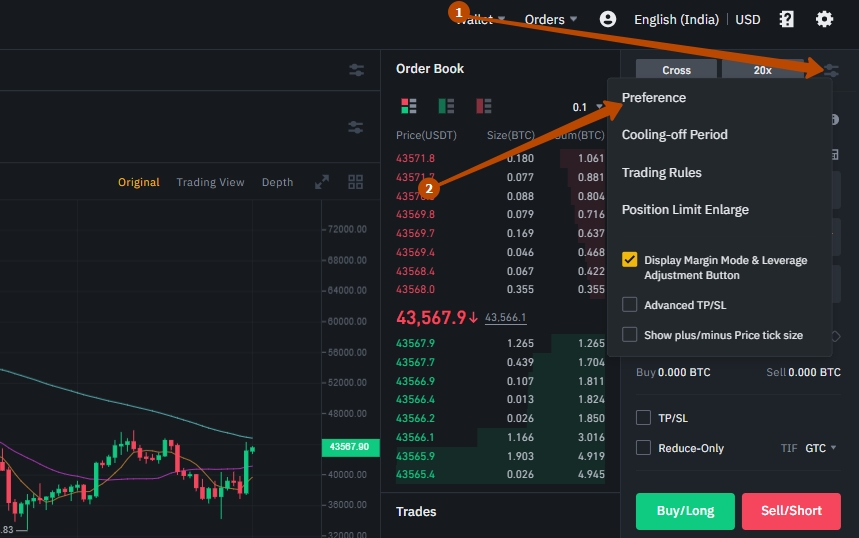
You can see what position mode is set on Binance here: